
Spring Security란?
Spring Security는 스프링 기반의 어플리케이션의 보안(인증과 권한)을 담당하는 프레임워크이다.
Spring Security를 사용하지 않는다면 자체적으로 세션을 체크하고 redirect를 처리해야한다. Spring Security에서는 이와 같은 보안과 관련한 기능들을 체계적으로 지원해준다.
스프링 시큐리티에서는 인증과 권한을 분리하여 체크할 수 있도록 구조를 만들었다.
•
Authentication(인증) : A라고 주장하는 주체(user, subject, principal)가 A가 맞는지 확인하는 것
•
Authorization(인가) : 특정 자원에 대해 권한이 있는지 확인하는 것
Spring Security에서는 인증과 인가를 위해 Principal을 아이디로, Credential을 비밀번호로 사용하는 Credential 기반의 인증 방식을 사용한다.
•
Principal(접근 주체) : Resource에 접근하는 대상
•
Credential(비밀번호) : Resource에 접근하는 대상의 비밀번호
서블릿 필터와 Spring Security
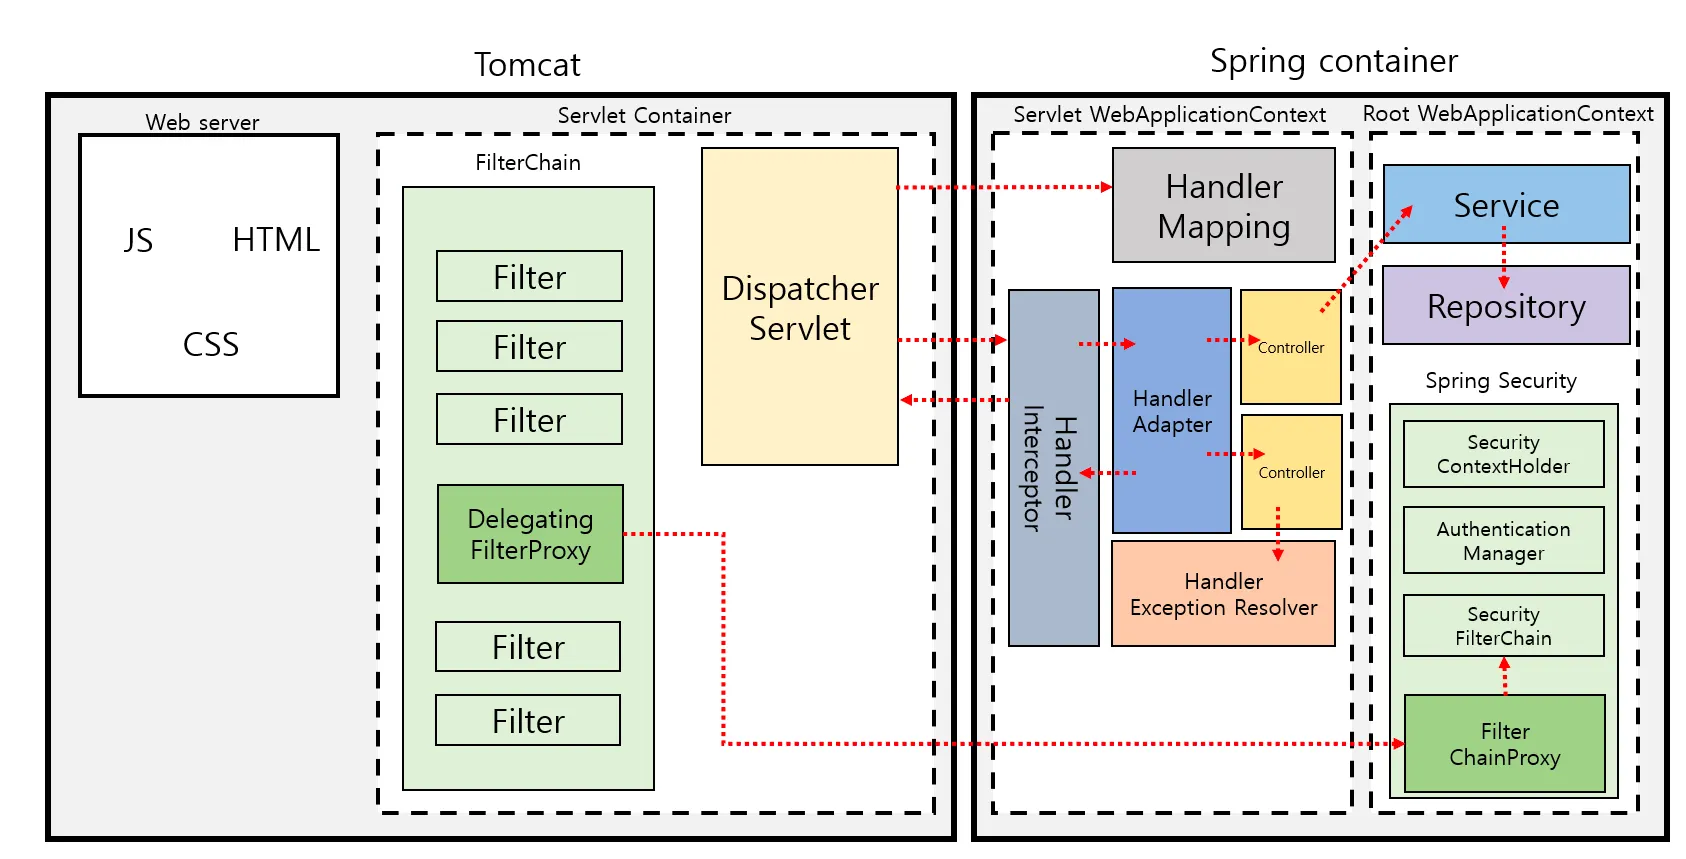
클라이언트에서 요청을 보내게 되면 Client(request) -> Filter -> DispatcherServlet -> Interceptor -> Controller 순으로 처리되는데, Filter는 DispatcherServlet 전에 적용되어 가장 먼저 URL 요청을 받는다.
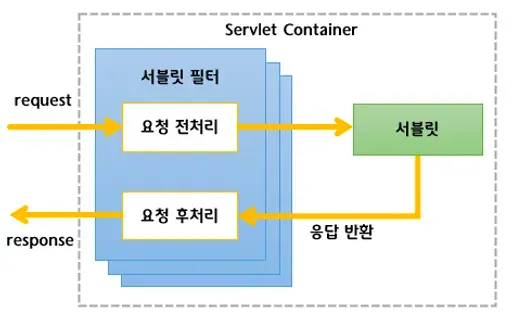
Spring Security는 서블릿 필터를 기반으로 인증과 인가에 대한 부분을 Filter 흐름에 따라 처리한다. 서블릿 필터는 서블릿의 전처리나 후처리 작업을 할 수 있는다.
하지만 Spring Bean은 Spring contianer에서 생성 및 관리하는 컴포넌트들이고, ServletFilter는 Servlet contianer에서 생성 및 관리하는 컴포넌트들이다. 서로 실행되는 위치가 다르기 때문에 ServletFilter는 Spring Bean을 주입해서 사용할 수 없다.
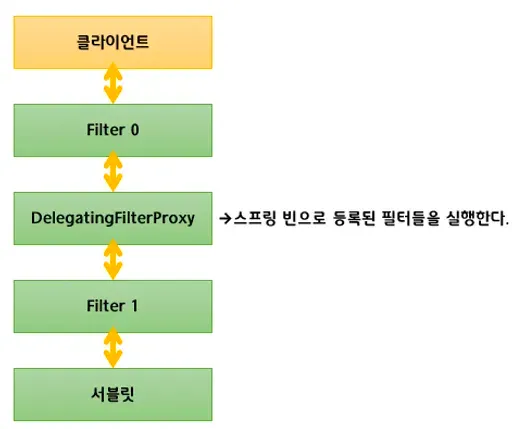
때문에 스프링 프레임워크에서는 서블릿 필터에 DelegatingFilterProxy라는 구현체를 제공하여, 해당 필터를 등록하면 직접 처리하지 않고 스프링 빈에 요청을 위임한다.
DelegatingFilterProxy에서 delegate request를 보내고, Spring Security에서 제공하는 FilterChainProxy에서 요청을 위임받아 서블릿 필터들을 Spring Ioc에 등록한다. 이를 통해 Spring IoC 컨테이너가 서블릿 필터를 Spring 빈으로 사용할 수 있게 된다.
FilterChainProxy는 SecurityFilterChain이라는 이름의 스프링 빈을 찾아, 각 필터들을 순서대로 호출하며 인증, 인가 및 각종 요청에 대한 처리를 수행한다. SecurityFilterChain에서는 여러 필터들로 구성되어 있는데, 고유한 설정을 가진 여러 개의 Security Filter Chain을 두고 URL마다 Security Filter를 맵핑할 수 있다.
SecurityContext
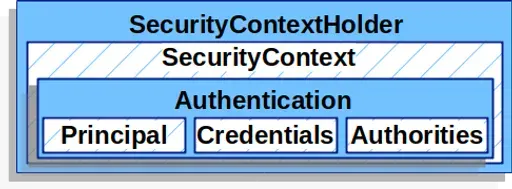
Servlet Container에서는 내부 인증 로직을 거친 후, 인증에 대한 정보들을 Authentication 객체에 담고 이를 SecurityContext 객체와 SecurityContextHolder 객체로 감싸 최종적으로 SecurityContextHolder 객체로 Spring Security에 제공한다.
SecurityContextHolder는 SecurityContext 객체를 Thread-local로 제공하여 같은 스레드에서는 언제든지 인증 정보에 접근할 수 있다.
Authentication 객체는 실질적으로 인증 정보를 담고 있는 객체이다.
public interface Authentication extends Principal, Serializable {
// 현재 사용자의 권한 목록을 가져옴
Collection<? extends GrantedAuthority> getAuthorities();
// credentials(주로 비밀번호)을 가져옴
Object getCredentials();
Object getDetails();
// Principal 객체를 가져옴
Object getPrincipal();
// 인증 여부를 가져옴
boolean isAuthenticated();
// 인증 여부를 설정함
void setAuthenticated(boolean isAuthenticated) throws IllegalArgumentException;
}
Java
복사
•
Principal
누구에 대한 인증 정보인지를 담고 있는 객체로, 로그인 ID에 해당하는 정보를 담고 있다.
•
Credentials
인증 자격에 대한 정보를 담고 있는 객체로, 비밀번호와 같은 암호를 담고 있다.
•
Authorities
인증 유저의 권한(ROLE)에 대한 정보를 담고 있다.
@Service
public class xxxService {
/**
* SecurityContextHolder를 통해 인증정보가 공유되는 지 테스트
*/
public void user() {
// SecurityContextHolder를 통해 인증정보 가져오기
Authentication authentication = SecurityContextHolder.getContext().getAuthentication();
// authentication의 인증정보 가져오기 (principal, authorities)
Object principal = authentication.getPrincipal();
Collection<? extends GrantedAuthority> authorities = authentication.getAuthorities();
// 인증여부 가져오기
boolean authenticated = authentication.isAuthenticated();
}
Java
복사
Spring Security 구조와 흐름
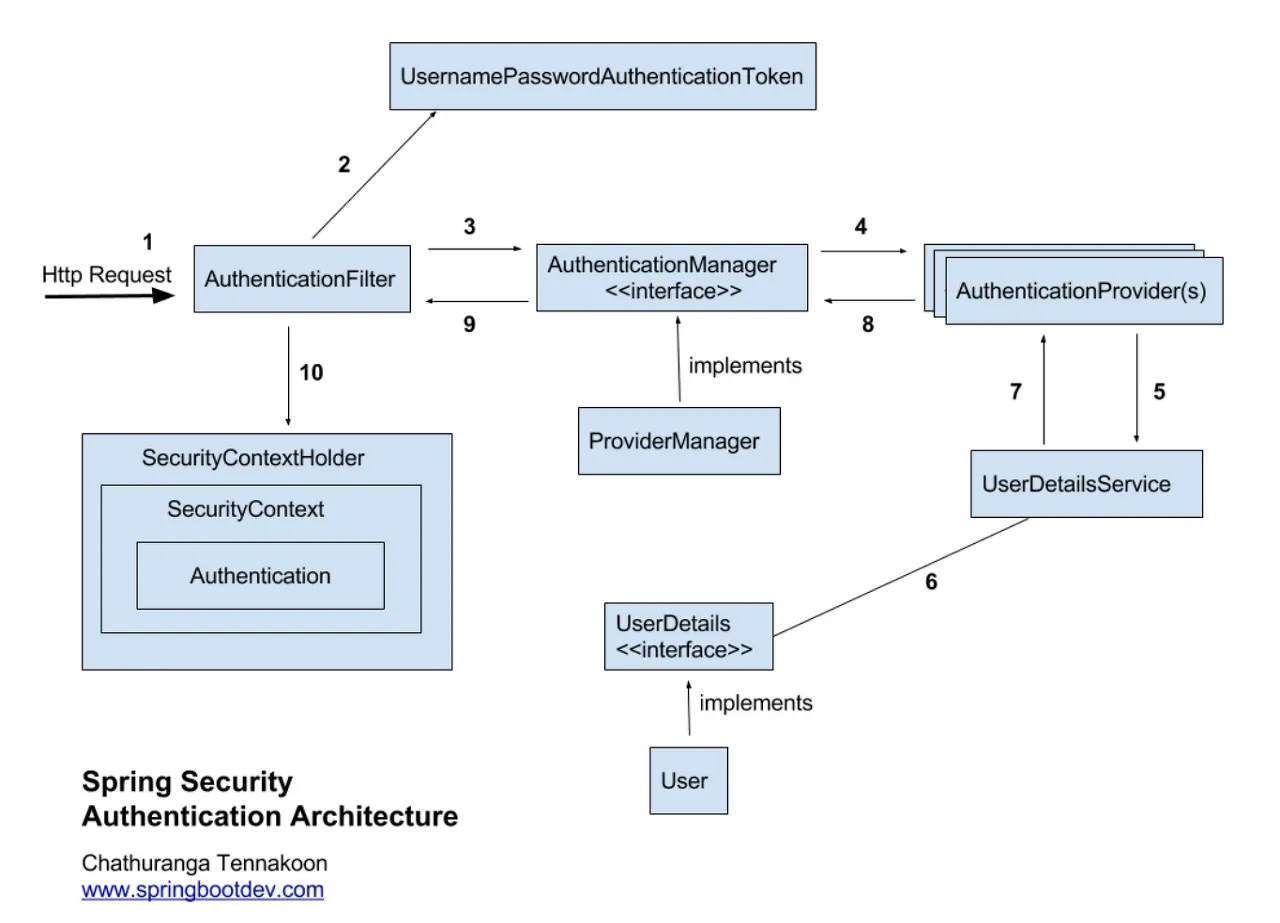
1.
사용자가 로그인 정보와 함께 인증을 요청(HttpRequest)
•
요청이 들어오면 인증과 권한을 위해 필터들을 통과한다.
•
인증 요청마다 알맞는 필터들을 통과하게 된다.
◦
HTTP 기본 인증을 요청하면 BasicAuthenticationFilter를 통과한다.
◦
HTTP Digest 인증을 요청하면 DigestAuthenticationFilter를 통과한다.
◦
로그인 폼에 의해 요청된 인증은 UserPasswordAuthenticationFilter를 통과한다.
◦
x509 인증을 요청하면 X509AuthenticationFilter를 통과한다.
2.
AuthenticationFilter가 요청을 가로채 UsernamePasswordAuthenticationToken 객체를 생성(인가되지 않은 Authentication을 생성함)
•
username과 password를 추출하여 유저 자격을 기반으로 인증 객체(UsernamePasswordAuthenticationToken 객체)를 생성한다.
public abstract class AbstractAuthenticationToken implements Authentication, CredentialsContainer {}
public class UsernamePasswordAuthenticationToken extends AbstractAuthenticationToken {
private static final long serialVersionUID = SpringSecurityCoreVersion.SERIAL_VERSION_UID;
// 주로 사용자의 ID에 해당
private final Object principal;
// 주로 사용자의 PW에 해당
private Object credentials;
// 인증 완료 전의 객체 생성
public UsernamePasswordAuthenticationToken(Object principal, Object credentials) {
super(null);
this.principal = principal;
this.credentials = credentials;
setAuthenticated(false);
}
// 인증 완료 후의 객체 생성
public UsernamePasswordAuthenticationToken(Object principal, Object credentials,
Collection<? extends GrantedAuthority> authorities) {
super(authorities);
this.principal = principal;
this.credentials = credentials;
super.setAuthenticated(true); // must use super, as we override
}
}
Java
복사
3.
Filter를 통해 AuthenticationManager에게 AuthenticationToken (UsernamePasswordAuthenticationToken 객체)을 전달
•
ProviderManager를 구현체로 가지는 AuthenticationManager 인터페이스에서 인증 메소드를 호출하여 UsernamePasswordAuthenticationToken 객체를 전달한다.
public interface AuthenticationManager{
Authentication authenticate(Authentication authentication) throws AuthenticationException;
}
Java
복사
•
AuthenticationManager를 사용하기 위해 AuthenticationManagerBuilder를 이용해 사용할 UserDetailsService를 매핑 시켜준다.
@Override
protected void configure(AuthenticationManagerBuilder auth) throws Exception {
auth.userDetailsService(loginService); // LongService가 UserDetailsService를 구현
}
Java
복사
4.
AuthenticationProvider에게 UsernamePasswordAuthenticationToken 객체를 전달
•
전달받은 Token을 통해 Core에 들어있는 AuthenticationProvider의 목록으로 인증을 시도한다.
public interface AuthenticationProvider {
Authentication authenticate(Authentication authentication) throws AuthenticationException;
boolean supports(Class<?> authentication);
}
Java
복사
5.
UserDetailsService에 사용자 정보를 전달
•
username을 기반으로 UserDetails를 검색한다.
public interface UserDetailsService {
UserDetails loadUserByUsername(String username) throws UsernameNotFoundException;
}
Java
복사
6.
전달받은 사용자 정보로 DB에서 사용자를 검색하여 UserDetails 객체를 생성
•
User 객체에 대한 정보를 검색하여 UserDetails 객체를 생성한다.
public interface UserDetails extends Serializable {
// 권한 목록
Collection<? extends GrantedAuthority> getAuthorities();
String getPassword();
String getUsername();
// 계정 만료 여부
boolean isAccountNonExpired();
// 계정 잠김 여부
boolean isAccountNonLocked();
// 비밀번호 만료 여부
boolean isCredentialsNonExpired();
// 사용자 활성화 여부
boolean isEnabled();
}
Java
복사
@Override
public UserDetails loadUserByUsername(String adminName) throws UsernameNotFoundException {
AdminUser adminUser = adminUserRepository.findByAdminName(adminName);
AdminUser admin = adminUser.get();
List<GrantedAuthority> authorities = new ArrayList<>();
if("ADMIN".equals(adminName)){
authorities.add(new SimpleGrantedAuthority(Role.ADMIN.getValue()));
} else {
authorities.add(new SimpleGrantedAuthority(Role.MEMBER.getValue()));
}
//User 객체에 아이디, 비밀번호, 권한정보를 넘겨준다.
return new User(admin.getAdminId(), admin.getPassword(), authorities);
}
Java
복사
7.
AuthenticationProvider가 UserDetailsService에서 전달받은 UseDetails로 사용자 정보를 비교
•
전달된 UserDetails 객체 정보와 사용자가 요청한 인증 정보(username, password)를 비교하여 인증 여부를 확인한다.
•
인증에 성공하면 전체 인증정보를 반환하고, 실패하면 AuthenticationException을 던진다.
8.
AuthenticationProvider에서 인증이 완료되면 사용자 정보를 담은 Authentication 객체를 AuthenticationManager에 반환
9.
Authentication 객체를 최초의 AuthenticationFilter에 반환
10.
Authentication 객체를 SecurityContext에 저장
SecurityContextHolder.getContext().setAuthentication(authentication);
Java
복사
위 과정에서 실질적인 인증은 사용자가 입력한 데이터(ID,PW등)와 UserDetails Service의 loadUSerByUsername() 메소드가 반환하는 UserDetails객체를 비교함으로써 동작한다. 따라서 UserDetailsService와 UserDetails 구현을 어떻게 하느냐에 따라 인증의 세부 과정이 달라진다.